Making Your First Open Source Contribution

Making your first contribution to an open source project can be intimidating - but it doesn’t have to be!
It took years of experience as a full-time software developer before I felt confident enough to start my open source journey - had I known then what I know now, I would have taken the plunge much sooner. In this article, I’ll outline some reasons why you should contribute to open source projects, as well as steps you can take to make your first contribution.
This article assumes that you are somewhat familiar with Git, and focuses on projects that are hosted on GitHub. Some knowledge of the programming/technical stack of the projects will be helpful, but not necessary - contributing to an open source project is a great way to learn something new.
. . .
Discussion forum
As part of this article, I’ve created a ![]() discussion forum on GitHub. Reach out if you have any questions, discussion topics, or just want to shout out your first contribution!
discussion forum on GitHub. Reach out if you have any questions, discussion topics, or just want to shout out your first contribution!
. . .
Why contribute to open source
Before talking about how to contribute, it’s important to talk about why. Many benefits come with making open source contributions, and I’ll touch on some of them here.
Giving back to the community
Open source software provides essential tools for developers and end-users alike. A 2024 analysis by Synopsis found that 96% of all code bases utilize open source software (intel.com). Open source projects are foundational to software, and are built and maintained by people like yourself! Becoming a contributor makes you a fundamental part of the community that keeps us all moving forward.
Skill and career benefits
Beyond the benefits of giving back to the community, becoming a contributor will have positive effects on your skill set and overall career.
Technical skills
Open source projects are all different; recognizing and becoming familiar with these differences gives you a breadth of knowledge that you may not get from your day job or from personal projects, where patterns and technologies are likely more static. Projects will utilize different architectures (e.g MVVM vs MVI) that can expand your familiarity with varied ways to approach a problem.
Some projects will flow easily, and some will be complex and nearly impossible to understand; both situations are great opportunities to expand your skill set. Understanding patterns that make software more digestible will help you build in a way that can be easily understood and maintained, as well as help you avoid common pitfalls.
Reading code will be a much larger part of your job as a software engineer than writing it, and working with projects of all shapes and sizes is a fantastic way to flex that muscle.
Soft skills
Open source work will test your ability to communicate with a wide variety of different people. Understanding how to clearly communicate with others is fundamental to being a great software engineer; in my experience, clear communication is just as important as raw technical skill. The distributed nature of open source projects makes this even more critical, and you’ll quickly understand how to better communicate topics, ideas, and changes to others.
Networking is often noted as the most important non-technical career building opportunity in software development. Open source projects provide the opportunity to network with engineers at every experience level, from different backgrounds and specialties.
Beyond meeting some great people and making friends, this will give you a wider network of peers when it comes time to look for a new gig. Importantly, this also gives you the opportunity to refer great engineers that you’ve worked with when they themselves are looking for new opportunities.
Building a portfolio
In my career, I’ve been on both sides of the interview process for software engineering positions more times than I can count. In all cases, I’ve observed that having publicly available work is a positive sign for a potential candidate. Having open source contributions in your portfolio won’t guarantee you a job, but it’s a signal that you’re passionate about building software, displaying real-life examples of your abilities in ways that traditional jobs don’t allow.
. . .
Types of contributions
Most people entering the open source space believe that adding new code is the only important contribution that you can make, but this is far from the truth. Open source projects, especially as they get larger, benefit greatly from many kinds of contributions.
Documentation
In software, documentation is arguably as important as the code itself. If no one can figure out how to build or run the project, there is an insurmountable barrier to its success. Since many open source contributors start their journey looking to only write code, documentation for open source projects can often be lacking in key areas. I’ve found even the smallest documentation updates that provide some extra clarity to the setup or usage of a project are met with open arms from the project’s maintainers.
This is an example of what might be the smallest open source contribution that I’ve ever made, and it happens to be updating documentation. Something as small as a typo can trip up potential users of a product; it’s important to remember that no contribution is too small!
Community discussion, bug reporting, and troubleshooting
Open source communities often don’t have dedicated testers, and this can make identifying specific details of issues difficult. Furthermore, non-technical users reporting issues may need help gathering logs and other debugging signals that help maintainers fix the problem.
Replicating issues and providing detailed bug reports with logs are extremely valuable contributions to any open source project. This can even mean creating your own repository that replicates the issue in question, making the job of the other contributors (or your future self, if you choose to fix the issue) that much easier.
This is an example of a bug report contribution that I made for ObjectBox, a powerful local data storage solution that I used in previous projects. It’s interesting to note that ObjectBox often doesn’t accept code contributions directly from third-party contributors, instead relying mostly on an internal team of maintainers. This is something you may run into for larger projects, and it’s OK! Creating a detailed issue with easy to replicate steps is still an important contribution to the project.
Code
Finally, the type of contribution that always comes to mind when we think of open source: code. Code is what makes the software work, and is likely why you’re interested in contributing in the first place - this is great! Many open source projects have more ideas and bugs than they do contributors, and will happily accept bug-fixes and new contributions.
As of late, I’ve been focusing some of my “open source time” on contributing to Meshtastic, a project that enables P2P communication using different kinds of accessible long-range radios (read more here). Beyond being a great project to use, Meshtastic has a welcoming community of maintainers running it - it could very well be your entry into the open source community!
To provide some examples of code contributions, this is a list of pull requests I’ve opened in the Meshtastic Android app. You’ll notice that the size and level of contributions varies wildly - from cleaning up some unused code to fixing a long-standing issue affecting the UI on some devices. Contributions of all types and sizes are worthwhile!
. . .

Guide to making your first open source contribution
Step 1 - Set a small goal
Arguably the most important step in this journey is to set a small initial goal. You might be excited to completely rewrite the UI of an application, and maybe someday you will! For your first contribution, it’s better to set a smaller and more achievable goal.
Remember, open source contributions are something that you’re doing on your own time and for the benefit of the community; you aren’t beholden to the same constraints that you are when working for a company. It’s important to keep this in mind, setting a pace that is maintainable over time. In this line of work, putting unrealistic expectations on yourself (both in your day job, and in your open source work) can be a slippery slope to burnout and adding stress to your life.
My suggestion for your first goal is to make any contribution at all. This doesn’t necessarily even mean getting a pull request (PR) merged in; as noted before, community discussion, help, and troubleshooting can be a small achievable goal that can benefit the project and open the door for more types of contributions in the future.
Remember, by any contribution I mean any contribution. Something as small as fixing a typo or fixing a string is helpful, and a good first goal to set.
Step 2 - Find projects that you already use
You likely use open source projects every day, both through libraries and the apps that you use. As an Android developer, it was surprising to find that many of my most-used apps were open source and accepting contributions (Habitica, Nextcloud, Signal, and Aegis just to name a few).
This step may come to you naturally - if you’re using an open source library and find a bug that you can investigate and fix, go for it! Otherwise, you can utilize GitHub’s Lists feature for maintaining lists of projects. As an example, I maintain lists of Android apps and Android libraries that I’m using (or just interested in), which is helpful when I’m looking for new projects that I’d like to contribute to.
Step 3 - Check if the project is open to accepting contributions
Upon finding a project that you’d like to contribute to, it’s important to check and make sure that the project is actually open to accepting contributions. There are a few clear signals that will tell you whether a project generally accepts contributions or not.
Check the contributing guidelines
The first thing you should check are the contributing guidelines included with the project. These are often defined in the CONTRIBUTING.md file (likely in the root of the project, example) or in the main README. The lack of contributing guidelines doesn’t necessarily rule the project out from direct code/documentation contributions, but it’s an indicator that the project may not be willing to merge PRs that you create.
Ask the community
Projects of any size will likely have some sort of community forum/center of discussion (i.e. GitHub Discussions, Discord, Slack) linked in their README. If the contributing guidelines and other signals aren’t clear, reach out and ask!
Check the Contributors graph
Looking at the graph of project contributors can give you insight on how often contributions are accepted. Using some previously noted examples, you can tell the difference between Meshtastic (accepts contributions, has a long list of contributors), and ObjectBox (generally doesn’t accept contributions, only has a handful of contributors). The size and age of the project can help you determine the status as well - older, larger projects that accept third party contributions will likely have hundreds of different contributors.
Check closed pull requests
Finally, the list of closed PRs (in any GitHub repository, this can be found by opening the Pull requests tab and filtering on Closed) for a repository can tell you whether the project is open to contributions or not. If you’re seeing all merged PRs being by the same one or two authors, while PRs from others are all marked closed, it might be a sign that this project doesn’t often accept contributions. Again, I’ll use Meshtastic as an example of a project that is open to accepting contributions.
Step 4 - Fork the project 
You’ve found a project you might want to contribute to, and it looks like it accepts contributions - now it’s time to fork ![]() ! Making a fork on GitHub is a simple process, and creating the fork now will make it that much easier to create your first PR. If you don’t end up wanting to make a contribution to this project after creating a fork, no sweat! You can delete a fork whenever you want; I myself have a small graveyard of forked repositories, some that I’ve made contributions to and others that I haven’t yet.
! Making a fork on GitHub is a simple process, and creating the fork now will make it that much easier to create your first PR. If you don’t end up wanting to make a contribution to this project after creating a fork, no sweat! You can delete a fork whenever you want; I myself have a small graveyard of forked repositories, some that I’ve made contributions to and others that I haven’t yet.
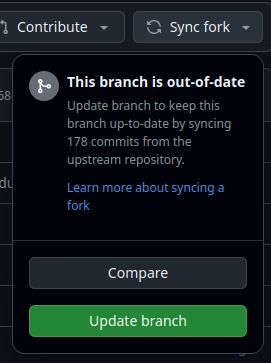
Your fork will look almost exactly like the main repository that you created the fork from. Here’s an example of my fork that you can compare to the main repository. GitHub makes it incredibly easy to keep your fork updated as the main repository receives changes; just click the Sync Fork -> Update branch option that shows near the top banner of your forked repository, and your main branch will be rebased/updated in line with the main repository:
Step 5 - Setup the project
You’ve created your fork, and now it’s time to pull to your local machine and build the project. If you’re anything like me, your first thought might be to toss any setup/help docs into a digital wood chipper and figure it out yourself. Don’t brute force it! For one, you’ll likely save yourself from scratching your head for half an hour when something doesn’t work as expected (because of a part of the process that’s likely laid out in the setup docs). More importantly for your journey of becoming an open source contributor, this is a great opportunity to make your first contribution!
Remember: all open source contributions are valuable, including documentation. Read through the setup docs (if they exist) while setting up the project, often noted in the README.md or referenced as a separate BUILDING.md or SETUP.md files. If you’re having trouble figuring out the setup process, others new to the project likely are as well. When you see anything that isn’t crystal clear, made you second guess yourself during setup, or even just has a simple typo - congratulations! Correcting these small issues can be your first contribution.
Step 6 - Find an area for your first contribution
Your project is setup and running; now it’s time to find something to work on. If you found some potential documentation improvements from the previous step, great - you can move on to turning this into a PR! If you didn’t find anything notable to update, or if you’re looking to make additional contributions, you can begin investigating potential areas of improvement.
Looking through open issues
Open issues are a great place to start looking for something to work on. Projects will often have the #good-first-issue label you can filter on; current maintainers will often apply this label to smaller issues that can introduce you to the project while fixing/adding. This is an example of that filtered list on a repository - note that each repository has minor differences, so labels can vary from project to project.
If you find an open issue you’d like to work on, add a quick comment to the issue that you’re investigating; this will make sure other contributors aren’t duplicating work. Also, don’t worry if you don’t end up finding a fix; you can always update with additional information you find, which will be helpful for someone else finding a fix.
Testing the project
Just using the software can provide you with insight on what to work on. One of the first code contributions that I made for an open source project was a bug that I accidentally found while using the app. On Android, issues often appear from rotating the device and causing a configuration change, a classic bug-causing scenario when not handled properly. Find a similar scenario for the project that you’re investigating, and go bug hunting ![]() .
.
If you do find a bug, it’s generally best to create an issue describing the details of that bug before putting up a PR for it - you can just call out in a comment that you’re currently investigating a fix.
Step 7 - Make your changes
You’ve identified what your contribution will be, and are ready to make the changes. There are a few things you can do to make your changes easier to review for maintainers.
Use a descriptive branch name
A clean and descriptive branch name will make it easier to identify what you’re working on. There are different views on how to properly name branches, and this might be called out in the project’s contributing guidelines. If no naming scheme is specified, a good rule of thumb for open source projects is to use the following scheme:
<your username>/<optional: issue # (if this change is tied to an issue)>/<brief description of change>
As an example, if I were opening a PR that fixes a crash when opening the “About” screen in an app that was logged in issue #100, this is how I’d name my branch:
jsoberg/#100/fix-crash-when-opening-about-screen
Remember: You should create your branch on your fork repository (e.g. jsoberg/Repository-Name), not the main repository (e.g main-repo-owner/Repository-Name).
Keep your changes small and concise
For your first PR in a project, you’ll likely want to make the changes as small as possible. Don’t commit any extraneous changes (i.e. empty lines, or formatting changes in files that you haven’t touched). If you see opportunities to cleanup code that may be a bit messier or add additional changes - great! Call this out in your PR description or in a new issue, and it can be a separate contribution that you make afterward. This rule applies for all projects, not just open source: aim to make every PR as concise as possible.
Make sure your changes work
The most important part of your PR is to make sure that it works before opening the PR. This means running the project locally and doing manual testing, as well as running any automated test suites that the project may have. If the project is setup for unit tests and your change is testable, add a new unit test to verify the change works as expected. If you’re not sure how to test the change yet, don’t worry - you can call this out as part of your PR description, asking maintainers how to best approach adding a test.
Step 8 - Open the pull request
You’re in the final stretch! Your changes are committed and pushed, and you’re ready to open your pull request.
Begin creating the pull request
The PR will originate from your fork repository branch created in the previous step. You can read more about the details of opening a PR from GitHub here, but the process is straightforward. After committing and pushing changes to your branch, a banner will appear on both your fork and main repositories that will direct you to opening the PR:

Clicking the Compare & pull request button here will open a view to see a diff of your changes, and allow you to enter the PR title and description. At the top of this new page, you’ll see the two branches that you’re comparing for this PR:

The left side is where you want the change to end up (the main repository), and the right side is where the change is coming from (your fork repository). The defaults here are likely what you need, so you shouldn’t have to change anything. In the above example, my changes on jsoberg/test-branch in my fork will end up in the main branch of the main repository (once the PR is approved and merged). It’s always good to double check the contributing guidelines to make sure this is correct.
Use a concise pull request title
The title should be a straightforward overview of what the changes are doing - i.e. Fix crash on About screen open or Move database call to background thread.
Additionally, you can include keywords that GitHub supports to automatically link your PR to an issue. As an example, fixes #123 - Fix crash on About screen open will automatically link this new PR to issue #123 in the main repository. Note that keywords also work in the PR description, so making a similar mention there will also link the PR to the appropriate issue.
Write a detailed pull request description
You’ll want to write a PR description that is detailed, but without much filler; this will make it easier to review for maintainers. There will likely be a template that shows by default when opening the PR, so make sure to follow any guidelines shown in the template.
With code changes that make a visible change to the project (e.g. in an Android app), it’s always preferred to add before and after screenshots to show how your update compares to the existing state. This confirms that you manually tested the change, while also giving maintainers a quick way to see differences.
Dragging an image into the PR will upload it to GitHub, adding some markdown like this to where you dropped it:


You can then use this simple markdown template in the PR for a before/after screenshot table comparison:
| Before | After |
|------|-----|
| <img src="<BEFORE image URL>" width="300"/> | <img src="<AFTER image URL>" width="300"/> |
Using the uploaded examples from above would look like this:
| Before | After |
|------|-----|
| <img src="https://github.com/user-attachments/assets/some-uuid-that-github-creates" width="300"/> | <img src="https://github.com/user-attachments/assets/another-uuid-that-github-creates" width="300"/> |
Create the PR
Smash that Create pull request button! This will open the PR on the main repository, and run any continuous integration (CI) jobs that the main repository may have set. If you ran tests locally you shouldn’t have a problem here, but if a job ends up failing it’s OK. The job should indicate what went wrong and then you can correct it - pushing any commits to your branch will automatically update the PR, and CI will run again.
Note that you shouldn’t rely solely on CI to verify your changes. CI is there to catch issues, but each run comes with some cost - so it’s better to verify your changes work before pushing them.
Step 9 - Wait 
Your PR is now open! Depending on the project, it may take some time for a maintainer to review it. I’ve seen PRs be reviewed in as quick as a few minutes, and some that have taken weeks - it all depends on how much time maintainers have to dedicate to the project. Your only job now is to be patient and wait for a review.
A maintainer may have feedback that they’ll want you to address before merging - this is OK. Communicate with the maintainers on the best path forward and relay any questions you may have, and then commit/push the appropriate changes - remember, this is what the PR process is all about!
. . .

Final thoughts
Congratulations - you’ve made your first open source contribution! This will make each subsequent contribution easier, and will help you on your path to becoming a well-rounded software engineer.
Have any questions that weren’t answered here, or want to shout out your first contribution? Add them to the ![]() discussion forum and let’s chat!
discussion forum and let’s chat!